Archiv der Kategorie: Inventor Api

how to create a command button with the inventor api

intension

in the previous post i showed how to create own ribbons, tabs, and buttons with the inventor api. In this post i will show you how you can define a button and automate the creation.

A lot of the code was taken from the Autodesk examples and from other websites. All my code can be found on github

create/define a button

the api needs a button description so that it can add something to a ribbon tab. Inventor has a command manager which holds all different commands.

  • Clientid –> AddinId
  • ButtonDisplayType
    • NoTextWithIcon
    • AlwaysDisplayText
    • DisplayTextInLearningMode
  • CommandTypes
    • ShapeEditCmdType
    • QueryOnlyCmdType
    • FileOperationsCmdType
    • FilePropertyEditCmdType
    • UpdateWithReferencesCmdType
    • NonShapeEditCmdType
    • EditMaskCmdType
    • ReferencesChangeCmdType
    • SchemaChangeCmdType

The following code sample was modified from the ‚SimpleAddin‘ Autodesk Inventor example.

buttonDefinition = app.CommandManager.ControlDefinitions.AddButtonDefinition(
	ibdc.DisplayName,
	ibdc.InternalName,
	ibdc.CommandType,
	ibdc.ClientId,
	ibdc.Description,
	ibdc.Tooltip,
	PictureDispConverter.ToIPictureDisp(ibdc.StandardIcon),
	PictureDispConverter.ToIPictureDisp(ibdc.LargeIcon),
	ibdc.ButtonDisplayType);

buttonDefinition.Enabled = true;
buttonDefinition.OnExecute += ButtonDefinition_OnExecute;

I modified the example so that it fits to my needs. I wanted a reusable, clean and easy to use button description.

How to create/define a button :

public class TestButton : Button
{
    private readonly string addinId;
    public TestButton([NotNull] Application application, string addinId) : base(application)
    {
        this.addinId = addinId;
    }

    protected override ButtonDescriptionContainer GetButtonDescription()
    {
        return new ButtonDescriptionContainer()
        {
            ButtonDisplayType = ButtonDisplayEnum.kNoTextWithIcon,
            CommandType = CommandTypesEnum.kShapeEditCmdType,
            Description = "Description",
            InternalName = "InternalName",
            DisplayName = "MyCreatedButton",
            ClientId = addinId,
            Tooltip = "this should be a ToolTip"       
        };
    }

    protected override void ButtonDefinition_OnExecute(NameValueMap context)
    {
        var frm = new ShowTextFrm();
        frm.ShowDialog();
    }
}

usage :

.
..

var buttonDescription = GetShowTextButton(addinId, application);
panel.CommandControls.AddButton(buttonDescription);

..................

private ButtonDefinition GetShowTextButton(string addinId, Application application)
{
    CommandCategory slotCmdCategory = application.CommandManager.CommandCategories.Add("Slot", "Autodesk:YourAddIn:ShowTextCmd", addinId);

    var btn = new TestButton(application, addinId);
    slotCmdCategory.Add(btn.ButtonDefinition);

    return btn.ButtonDefinition;
}
 /// <summary>
/// taken from the inventor 'SimpleAddIn' Sample
/// </summary>
public abstract class Button
{
    private ButtonDefinition buttonDefinition;
    protected abstract ButtonDescriptionContainer GetButtonDescription();
    public ButtonDefinition ButtonDefinition => buttonDefinition;

    protected Button([NotNull] Application application)
    {
        Initialize(application);
    }

    private void Initialize([NotNull] Application app)
    {
        if (app == null) throw new ArgumentNullException(nameof(app));

        var descriptionContainer = GetButtonDescription();

        if (descriptionContainer is IconButtonDescriptorContainer ibdc && ibdc.StandardIcon != null && ibdc.LargeIcon != null)
        {
            buttonDefinition = app.CommandManager.ControlDefinitions.AddButtonDefinition(
                ibdc.DisplayName,
                ibdc.InternalName,
                ibdc.CommandType,
                ibdc.ClientId,
                ibdc.Description,
                ibdc.Tooltip,
                PictureDispConverter.ToIPictureDisp(ibdc.StandardIcon),
                PictureDispConverter.ToIPictureDisp(ibdc.LargeIcon),
                ibdc.ButtonDisplayType);
        }
        else
        {
            buttonDefinition = app.CommandManager.ControlDefinitions.AddButtonDefinition(
                descriptionContainer.DisplayName,
                descriptionContainer.InternalName,
                descriptionContainer.CommandType,
                descriptionContainer.ClientId,
                descriptionContainer.Description,
                descriptionContainer.Tooltip,
                Type.Missing,
                Type.Missing,
                descriptionContainer.ButtonDisplayType);
        }

        buttonDefinition.Enabled = true;
        buttonDefinition.OnExecute += ButtonDefinition_OnExecute;
    }

    protected abstract void ButtonDefinition_OnExecute(NameValueMap context);
}

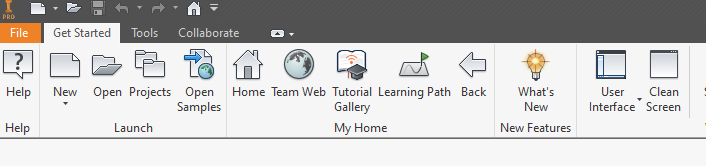
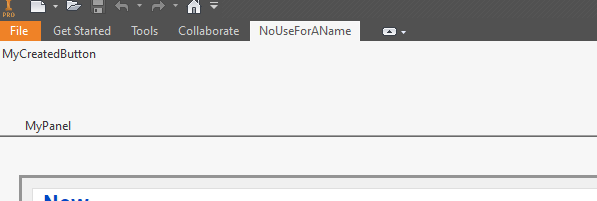
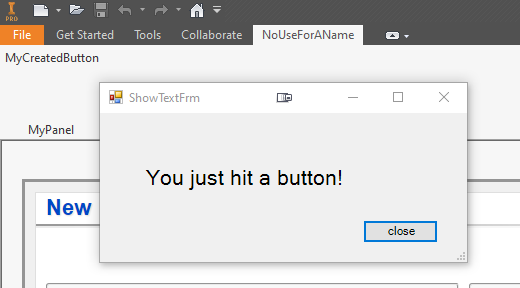
If you run this example your button should look like this

create a ribbon buttons/commands with the inventor api

in the post i will show you how to create your own ribbon button with the inventor api.

The code i use here can be found on my gibhub page

understand the UI concept

First of all we need to understand how the ribbons in inventor works. Inventor uses so called ‚Ribbons‘ to show you the nesseary UI. A full description of the concept can be found in the official documentation. According what you are doing you see different Ribbon. If you open a ‚Part‘ you see the ‚Part Ribbon‘, if you open a ‚Assembly Parts‘ you see the ‚Assembly Ribbon‘.

A full list of the ribbons and the attached tabs can be found here.

create a ribbon tab

in this example we are going to create a ribbon tab in the ’startup(ZeroDoc)‘ ribbon.

var ribbons = application.UserInterfaceManager.Ribbons;
var ribbonName = "ZeroDoc";
var idMyOwnTab = "id_Tab_MyOwnTab";
RibbonTab ribbonTab;

if (!RibbonTabExists(application.UserInterfaceManager, ribbonName, idMyOwnTab))
{
    ribbonTab = ribbons[ribbonName].RibbonTabs.Add("NoUseForAName", idMyOwnTab, addinId);
}
else
{
    ribbonTab = ribbons[ribbonName].RibbonTabs[idMyOwnTab];
}

So if i run this we see –> nothing happens ! Maybe the application checks if the ribbon is empty. So now we add a tab to the ribbon!

create a ribbon panel

We need the id of the previous created ribbon tab.

if (RibbonPanelExists(application.UserInterfaceManager, ribbonName, idMyOwnTab, idMyOwnPanel)) return;
var panel = ribbonTab.RibbonPanels.Add("MyPanel", idMyOwnPanel, addinId, "", false);
private static bool RibbonTabExists(UserInterfaceManager userInterfaceManager, string ribbonName, string tabName)
{
    var ribbons = userInterfaceManager.Ribbons;
    foreach (RibbonTab tab in ribbons[ribbonName].RibbonTabs)
    {
        if (tab.InternalName == tabName) return true;
    }
    return false;
}

add a command/button

After adding a panel and checking the output there is still no ribbon-tab and or a ribbon panel. So a command or button is missing. Creating a button is a whole chapter. Here is the needed code:

var buttonDescription = GetShowTextButton(addinId, application);
panel.CommandControls.AddButton(buttonDescription);

The complete code should look like this:

private void CreateRibbonPanel(string addinId, Application application)
{
    if (addinId is null) throw new ArgumentNullException(nameof(addinId));
    if (application == null) throw new ArgumentNullException(nameof(application));

    var ribbons = application.UserInterfaceManager.Ribbons;
    var ribbonName = "ZeroDoc";
    var idMyOwnTab = "id_Tab_MyOwnTab";
    var idMyOwnPanel = "id_Tab_MyOwnPanel";
    RibbonTab ribbonTab;

    if (!RibbonTabExists(application.UserInterfaceManager, ribbonName, idMyOwnTab))
    {
        ribbonTab = ribbons[ribbonName].RibbonTabs.Add("NoUseForAName", idMyOwnTab, addinId);
    }
    else
    {
        ribbonTab = ribbons[ribbonName].RibbonTabs[idMyOwnTab];
    }

    if (RibbonPanelExists(application.UserInterfaceManager, ribbonName, idMyOwnTab, idMyOwnPanel)) return;

    var panel = ribbonTab.RibbonPanels.Add("MyPanel", idMyOwnPanel, addinId, "", false);
  
    var buttonDescription = GetShowTextButton(addinId, application);
    panel.CommandControls.AddButton(buttonDescription);
}

Boom now it works 😀 The Result looks like this

All the sourcecode can be found in my github reposetory. How to create a button aka the button-description can be found here

extract inventor developer tools without Visual Studio installed

in this article will show how to extract the data from an msi (developer tools.msi) to at custom folder without having the dependencies installed.

If you have Visual Studio 2019 or above you cannot install the developer.msi. It will throw an exception that you need to install Visual Studio 2017.

Thanks to Mika who pointed me in the right direction it is possible to get the tools out of the msi.

  1. open command line
  2. (msiexec /a „C:\Users\Public\Documents\Autodesk\Inventor 2019\SDK\developertools.msi“ TargetDir=C:\Temp\dt) doc link
Weiterlesen

deploy your inventor addIn

where to put your addin files so that inventor will know and how to deploy this to your clients.

where to put your files

Every time Inventor starts it will look in different folders for the *.addin file.

  1. All Users, Version Independent %ALLUSERSPROFILE%\Autodesk\Inventor Addins\
  2. All Users, Version Dependent
    %ALLUSERSPROFILE%\Autodesk\Inventor 2013\Addins\
  3. Per User, Version Dependent
    %APPDATA%\Autodesk\Inventor 2013\Addins\
  4. Per User, Version Independent
    %APPDATA%\Autodesk\ApplicationPlugins

check this for more information.

end user deployment

Deploying your code to the end user can be difficult. I recommend using an installer/ setup to deploy your Addin. This ensures that the addin is installed/ unistalled correctly and if you change the installation folder you can do this without any trouble.

I tried and used a few installer. Here are some of my thoughts.

I recommend using ‚folder/file copy‘ installer. In some cases the dependecy determine can fail and does not install the right assemblies or versions.

deployment via msi package and Inno Setup

In my case i am using ‚Inno Setup‚ and the related ‚Inno Script Studio‚. It is a free installer for Windows msi. It also has an CI-CD support for Azure Dev Ops support available on github.

the following setup is located in the folder : ..\AddInFolder\Deployment

; Script generated by the Inno Script Studio Wizard.
; SEE THE DOCUMENTATION FOR DETAILS ON CREATING INNO SETUP SCRIPT FILES!

#define MyAppName "MBTTools.Deployment"
#define MyAppVersion "0.1.6.22"
#define MyAppPublisher "MBT Tools"
#define MyAppURL "http://www.example.com/"

[Setup]
; NOTE: The value of AppId uniquely identifies this application.
; Do not use the same AppId value in installers for other applications.
; (To generate a new GUID, click Tools | Generate GUID inside the IDE.)
AppId={{D1303A7C-F22B-49B3-8E60-A22BA82DA0D1}
AppName={#MyAppName}
AppVersion={#MyAppVersion}
;AppVerName={#MyAppName} {#MyAppVersion}
AppPublisher={#MyAppPublisher}
AppPublisherURL={#MyAppURL}
AppSupportURL={#MyAppURL}
AppUpdatesURL={#MyAppURL}
DefaultDirName={commonappdata}\Autodesk\ApplicationPlugins\MBDPowerTools
DefaultGroupName={#MyAppName}
DisableProgramGroupPage=yes
OutputDir=..\AddInFolder\Deployment
OutputBaseFilename=<name>Installer
Compression=lzma
SolidCompression=yes

[Languages]
Name: "english"; MessagesFile: "compiler:Default.isl"
Name: "german"; MessagesFile: "compiler:Languages\German.isl"

[InstallDelete]
Type: filesandordirs; Name: "{sd}\ProgramData\Autodesk\ApplicationPlugins\<Name>\*"
Type: filesandordirs; Name: "{sd}\ProgramData\Autodesk\ApplicationPlugins\<Name>Tools\*"
Type: filesandordirs; Name: "{commonpf}\Autodesk\ApplicationPlugins\<Name>\*"; Languages: english german
Type: filesandordirs; Name: "{commonpf}\Autodesk\ApplicationPlugins\<Name>Tools\*"; Languages: english german


[Files]
Source: "..\<Name>\bin\Debug\*"; DestDir: "{commonappdata}\Autodesk\ApplicationPlugins\<Name>Tools"; Flags: ignoreversion recursesubdirs createallsubdirs
; NOTE: Don't use "Flags: ignoreversion" on any shared system files

[Icons]
Name: "{group}\{cm:UninstallProgram,{#MyAppName}}"; Filename: "{uninstallexe}"

create a inventor addIn project

on this post i will show you how to create an inventor addIn solution/project via templates.

Visual Studio Templates

If you want to use the visual studio Templates you need to have the SDK installed.

The SDK : developertools.msi only supports Visualstudio 2017. If you want to use the template syou need to install a basic version of the VS2017 and then you can install the needed msi package.

The installer will copy some Templates in the folder

C:\Users\<User>\Documents\Visual Studio 2017\Templates\ProjectTemplates

installed inventor templates
Weiterlesen

getting started with the Inventor api

intention

on this site i will talk about how you can start implementing your own add in for the 3D CAD Software Inventor. This will explain how to implement a basic addin without any functionality.

Inventor provides a lot of functionality , but sometimes you want to improve these features or you want to add own features. You can achive this with the powerfull Inventor Api.

The used example can be found on GitHub.

requirements

  • Inventor installed (theoreticly you do not need Inventor installed. You just need the refernce to the ‚Autodesk.Inventor.Interop‘ assembly)
  • optional: Inventor SDk installed
Weiterlesen