In this article i will show you how authenticate against google with oauth and a mobile app.
When i was trying to get the authentication running, i did not find a good working example for a android phone and Xamarin. There are a lot of good post and blogs out in the internet, but somehow they uses deprecated libs a lot.
in the previous post i showed how to create own ribbons, tabs, and buttons with the inventor api. In this post i will show you how you can define a button and automate the creation.
A lot of the code was taken from the Autodesk examples and from other websites. All my code can be found on github
create/define a button
the api needs a button description so that it can add something to a ribbon tab. Inventor has a command manager which holds all different commands.
Clientid –> AddinId
ButtonDisplayType
NoTextWithIcon
AlwaysDisplayText
DisplayTextInLearningMode
CommandTypes
ShapeEditCmdType
QueryOnlyCmdType
FileOperationsCmdType
FilePropertyEditCmdType
UpdateWithReferencesCmdType
NonShapeEditCmdType
EditMaskCmdType
ReferencesChangeCmdType
SchemaChangeCmdType
The following code sample was modified from the ‚SimpleAddin‘ Autodesk Inventor example.
First of all we need to understand how the ribbons in inventor works. Inventor uses so called ‚Ribbons‘ to show you the nesseary UI. A full description of the concept can be found in the official documentation. According what you are doing you see different Ribbon. If you open a ‚Part‘ you see the ‚Part Ribbon‘, if you open a ‚Assembly Parts‘ you see the ‚Assembly Ribbon‘.
A full list of the ribbons and the attached tabs can be found here.
create a ribbon tab
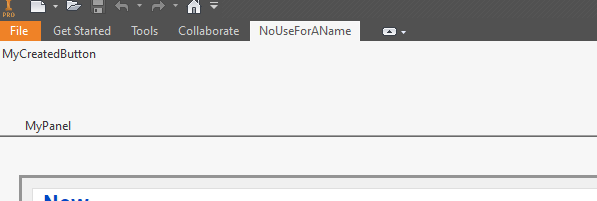
in this example we are going to create a ribbon tab in the ’startup(ZeroDoc)‘ ribbon.
var ribbons = application.UserInterfaceManager.Ribbons;
var ribbonName = "ZeroDoc";
var idMyOwnTab = "id_Tab_MyOwnTab";
RibbonTab ribbonTab;

if (!RibbonTabExists(application.UserInterfaceManager, ribbonName, idMyOwnTab))
{
    ribbonTab = ribbons[ribbonName].RibbonTabs.Add("NoUseForAName", idMyOwnTab, addinId);
}
else
{
    ribbonTab = ribbons[ribbonName].RibbonTabs[idMyOwnTab];
}
So if i run this we see –> nothing happens ! Maybe the application checks if the ribbon is empty. So now we add a tab to the ribbon!
create a ribbon panel
We need the id of the previous created ribbon tab.
if (RibbonPanelExists(application.UserInterfaceManager, ribbonName, idMyOwnTab, idMyOwnPanel)) return;
var panel = ribbonTab.RibbonPanels.Add("MyPanel", idMyOwnPanel, addinId, "", false);
private static bool RibbonTabExists(UserInterfaceManager userInterfaceManager, string ribbonName, string tabName)
{
    var ribbons = userInterfaceManager.Ribbons;
    foreach (RibbonTab tab in ribbons[ribbonName].RibbonTabs)
    {
        if (tab.InternalName == tabName) return true;
    }
    return false;
}
add a command/button
After adding a panel and checking the output there is still no ribbon-tab and or a ribbon panel. So a command or button is missing. Creating a button is a whole chapter. Here is the needed code:
var buttonDescription = GetShowTextButton(addinId, application);
panel.CommandControls.AddButton(buttonDescription);
The complete code should look like this:
private void CreateRibbonPanel(string addinId, Application application)
{
    if (addinId is null) throw new ArgumentNullException(nameof(addinId));
    if (application == null) throw new ArgumentNullException(nameof(application));

    var ribbons = application.UserInterfaceManager.Ribbons;
    var ribbonName = "ZeroDoc";
    var idMyOwnTab = "id_Tab_MyOwnTab";
    var idMyOwnPanel = "id_Tab_MyOwnPanel";
    RibbonTab ribbonTab;

    if (!RibbonTabExists(application.UserInterfaceManager, ribbonName, idMyOwnTab))
    {
        ribbonTab = ribbons[ribbonName].RibbonTabs.Add("NoUseForAName", idMyOwnTab, addinId);
    }
    else
    {
        ribbonTab = ribbons[ribbonName].RibbonTabs[idMyOwnTab];
    }

    if (RibbonPanelExists(application.UserInterfaceManager, ribbonName, idMyOwnTab, idMyOwnPanel)) return;

    var panel = ribbonTab.RibbonPanels.Add("MyPanel", idMyOwnPanel, addinId, "", false);

    var buttonDescription = GetShowTextButton(addinId, application);
    panel.CommandControls.AddButton(buttonDescription);
}
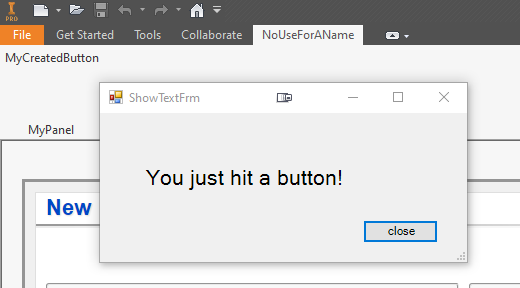
Boom now it works 😀 The Result looks like this
All the sourcecode can be found in my github reposetory. How to create a button aka the button-description can be found here
unit test are annoying and time consuming. ist not fun at all, and the customer does not see any value in tests…..
i hear this all the time, and at some point in my tech career i also belived this. Then i wrote my first test an found a bug. At this point lightbulds started to glow and i realised that i woul not found the bug bymyself.
In the worst case the customer would have found the bug :C
As we all know writing tests makes our software more stable and maintainability will be increased.
unit tests with the inventor api
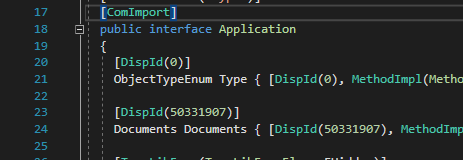
AutoCad Inventor makes it very difficult to write testable code. At some point i thought that i am lucky. The api is completly build by interfaces.
Deploying your code to the end user can be difficult. I recommend using an installer/ setup to deploy your Addin. This ensures that the addin is installed/ unistalled correctly and if you change the installation folder you can do this without any trouble.
I tried and used a few installer. Here are some of my thoughts.
I recommend using ‚folder/file copy‘ installer. In some cases the dependecy determine can fail and does not install the right assemblies or versions.
deployment via msi package and Inno Setup
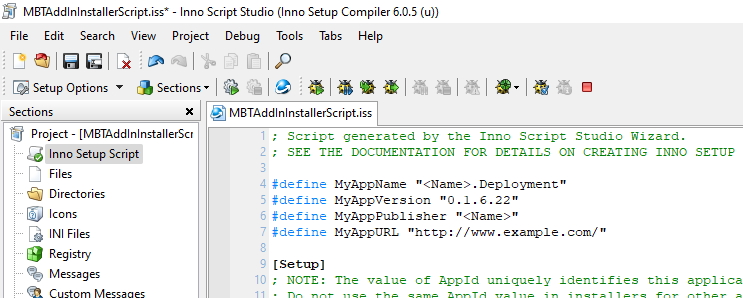
In my case i am using ‚Inno Setup‚ and the related ‚Inno Script Studio‚. It is a free installer for Windows msi. It also has an CI-CD support for Azure Dev Ops support available on github.
the following setup is located in the folder : ..\AddInFolder\Deployment
; Script generated by the Inno Script Studio Wizard.
; SEE THE DOCUMENTATION FOR DETAILS ON CREATING INNO SETUP SCRIPT FILES!

#define MyAppName "MBTTools.Deployment"
#define MyAppVersion "0.1.6.22"
#define MyAppPublisher "MBT Tools"
#define MyAppURL "http://www.example.com/"

[Setup]
; NOTE: The value of AppId uniquely identifies this application.
; Do not use the same AppId value in installers for other applications.
; (To generate a new GUID, click Tools | Generate GUID inside the IDE.)
AppId={{D1303A7C-F22B-49B3-8E60-A22BA82DA0D1}
AppName={#MyAppName}
AppVersion={#MyAppVersion}
;AppVerName={#MyAppName} {#MyAppVersion}
AppPublisher={#MyAppPublisher}
AppPublisherURL={#MyAppURL}
AppSupportURL={#MyAppURL}
AppUpdatesURL={#MyAppURL}
DefaultDirName={commonappdata}\Autodesk\ApplicationPlugins\MBDPowerTools
DefaultGroupName={#MyAppName}
DisableProgramGroupPage=yes
OutputDir=..\AddInFolder\Deployment
OutputBaseFilename=<name>Installer
Compression=lzma
SolidCompression=yes

[Languages]
Name: "english"; MessagesFile: "compiler:Default.isl"
Name: "german"; MessagesFile: "compiler:Languages\German.isl"

[InstallDelete]
Type: filesandordirs; Name: "{sd}\ProgramData\Autodesk\ApplicationPlugins\<Name>\*"
Type: filesandordirs; Name: "{sd}\ProgramData\Autodesk\ApplicationPlugins\<Name>Tools\*"
Type: filesandordirs; Name: "{commonpf}\Autodesk\ApplicationPlugins\<Name>\*"; Languages: english german
Type: filesandordirs; Name: "{commonpf}\Autodesk\ApplicationPlugins\<Name>Tools\*"; Languages: english german


[Files]
Source: "..\<Name>\bin\Debug\*"; DestDir: "{commonappdata}\Autodesk\ApplicationPlugins\<Name>Tools"; Flags: ignoreversion recursesubdirs createallsubdirs
; NOTE: Don't use "Flags: ignoreversion" on any shared system files

[Icons]
Name: "{group}\{cm:UninstallProgram,{#MyAppName}}"; Filename: "{uninstallexe}"
on this post i will show you how to create an inventor addIn solution/project via templates.
Visual Studio Templates
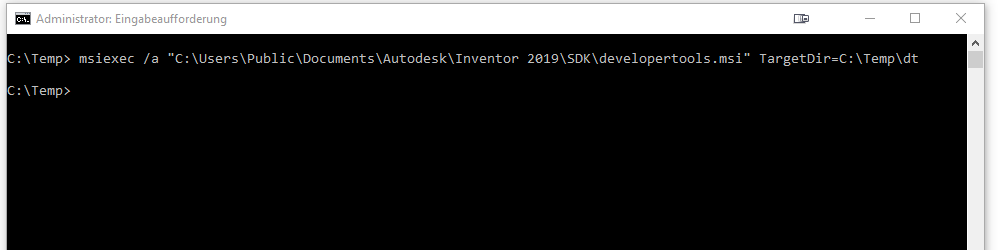
If you want to use the visual studio Templates you need to have the SDK installed.
The SDK : developertools.msi only supports Visualstudio 2017. If you want to use the template syou need to install a basic version of the VS2017 and then you can install the needed msi package.
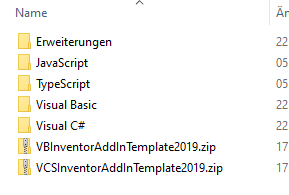
The installer will copy some Templates in the folder
C:\Users\<User>\Documents\Visual Studio 2017\Templates\ProjectTemplates
on this site i will talk about how you can start implementing your own add in for the 3D CAD Software Inventor. This will explain how to implement a basic addin without any functionality.
Inventor provides a lot of functionality , but sometimes you want to improve these features or you want to add own features. You can achive this with the powerfull Inventor Api.
Die Inhalte unserer Seiten wurden mit größter Sorgfalt erstellt. Für die Richtigkeit, Vollständigkeit und Aktualität der Inhalte können wir jedoch keine Gewähr übernehmen. Als Diensteanbieter sind wir gemäß § 7 Abs.1 TMG für eigene Inhalte auf diesen Seiten nach den allgemeinen Gesetzen verantwortlich. Nach §§ 8 bis 10 TMG sind wir als Diensteanbieter jedoch nicht verpflichtet, übermittelte oder gespeicherte fremde Informationen zu überwachen oder nach Umständen zu forschen, die auf eine rechtswidrige Tätigkeit hinweisen. Verpflichtungen zur Entfernung oder Sperrung der Nutzung von Informationen nach den allgemeinen Gesetzen bleiben hiervon unberührt. Eine diesbezügliche Haftung ist jedoch erst ab dem Zeitpunkt der Kenntnis einer konkreten Rechtsverletzung möglich. Bei Bekanntwerden von entsprechenden Rechtsverletzungen werden wir diese Inhalte umgehend entfernen.
Haftung für Links
Unser Angebot enthält Links zu externen Webseiten Dritter, auf deren Inhalte wir keinen Einfluss haben. Deshalb können wir für diese fremden Inhalte auch keine Gewähr übernehmen. Für die Inhalte der verlinkten Seiten ist stets der jeweilige Anbieter oder Betreiber der Seiten verantwortlich. Die verlinkten Seiten wurden zum Zeitpunkt der Verlinkung auf mögliche Rechtsverstöße überprüft. Rechtswidrige Inhalte waren zum Zeitpunkt der Verlinkung nicht erkennbar. Eine permanente inhaltliche Kontrolle der verlinkten Seiten ist jedoch ohne konkrete Anhaltspunkte einer Rechtsverletzung nicht zumutbar. Bei Bekanntwerden von Rechtsverletzungen werden wir derartige Links umgehend entfernen.
Google Analytics
Diese Website benutzt Google Analytics, einen Webanalysedienst der Google Inc. (“Google“). Google Analytics verwendet sog. “Cookies“, Textdateien, die auf Ihrem Computer gespeichert werden und die eine Analyse der Benutzung der Website durch Sie ermöglicht. Die durch den Cookie erzeugten Informationen über Ihre Benutzung dieser Website (einschließlich Ihrer IP-Adresse) wird an einen Server von Google in den USA übertragen und dort gespeichert. Google wird diese Informationen benutzen, um Ihre Nutzung der Website auszuwerten, um Reports über die Websiteaktivitäten für die Websitebetreiber zusammenzustellen und um weitere mit der Websitenutzung und der Internetnutzung verbundene Dienstleistungen zu erbringen. Auch wird Google diese Informationen gegebenenfalls an Dritte übertragen, sofern dies gesetzlich vorgeschrieben oder soweit Dritte diese Daten im Auftrag von Google verarbeiten. Google wird in keinem Fall Ihre IP-Adresse mit anderen Daten der Google in Verbindung bringen. Sie können die Installation der Cookies durch eine entsprechende Einstellung Ihrer Browser Software verhindern; wir weisen Sie jedoch darauf hin, dass Sie in diesem Fall gegebenenfalls nicht sämtliche Funktionen dieser Website voll umfänglich nutzen können. Durch die Nutzung dieser Website erklären Sie sich mit der Bearbeitung der über Sie erhobenen Daten durch Google in der zuvor beschriebenen Art und Weise und zu dem zuvor benannten Zweck einverstanden.
Google AdSense
Diese Website benutzt Google Adsense, einen Webanzeigendienst der Google Inc., USA (“Google“). Google Adsense verwendet sog. “Cookies“ (Textdateien), die auf Ihrem Computer gespeichert werden und die eine Analyse der Benutzung der Website durch Sie ermöglicht. Google Adsense verwendet auch sog. “Web Beacons“ (kleine unsichtbare Grafiken) zur Sammlung von Informationen. Durch die Verwendung des Web Beacons können einfache Aktionen wie der Besucherverkehr auf der Webseite aufgezeichnet und gesammelt werden. Die durch den Cookie und/oder Web Beacon erzeugten Informationen über Ihre Benutzung dieser Website (einschließlich Ihrer IP-Adresse) werden an einen Server von Google in den USA übertragen und dort gespeichert. Google wird diese Informationen benutzen, um Ihre Nutzung der Website im Hinblick auf die Anzeigen auszuwerten, um Reports über die Websiteaktivitäten und Anzeigen für die Websitebetreiber zusammenzustellen und um weitere mit der Websitenutzung und der Internetnutzung verbundene Dienstleistungen zu erbringen. Auch wird Google diese Informationen gegebenenfalls an Dritte übertragen, sofern dies gesetzlich vorgeschrieben oder soweit Dritte diese Daten im Auftrag von Google verarbeiten. Google wird in keinem Fall Ihre IP-Adresse mit anderen Daten der Google in Verbindung bringen. Das Speichern von Cookies auf Ihrer Festplatte und die Anzeige von Web Beacons können Sie verhindern, indem Sie in Ihren Browser-Einstellungen “keine Cookies akzeptieren“ wählen (Im MS Internet-Explorer unter “Extras > Internetoptionen > Datenschutz > Einstellung“; im Firefox unter “Extras > Einstellungen > Datenschutz > Cookies“); wir weisen Sie jedoch darauf hin, dass Sie in diesem Fall gegebenenfalls nicht sämtliche Funktionen dieser Website voll umfänglich nutzen können. Durch die Nutzung dieser Website erklären Sie sich mit der Bearbeitung der über Sie erhobenen Daten durch Google in der zuvor beschriebenen Art und Weise und zu dem zuvor benannten Zweck einverstanden.